Gimp Video Duplicate Continue is Only Choice
Copy and paste are two of the most useful commands that you can use on a computer, no matter what you're doing, and GIMP is no exception to the rule. It does have some interesting quirks that make it a bit different than copying and pasting text in a word processor, so let's take a look at how it all works.
Quick Navigation
- All Thanks To Lawrence Tesler (1945-2020)
- The Quick Guide to Copy and Paste in GIMP
- The Detailed Guide to Copy and Paste in GIMP
- Step 1: Making A Selection
- Step 2: Copy Your Selection
- Step 3: Paste Your Selection
- Step 4: Finalizing Your Floating Selection
- Bonus Tip: Copying From Outside GIMP
All Thanks To Lawrence Tesler (1945-2020)
No article about copy and paste commands would be complete without paying tribute to Larry Tesler, who recently passed away in February 2020 at age 74. While working at Xerox PARC in the early 1980s, he invented the basic cut, copy, and paste commands we still use today, as well as several other industry-standard processes and terms.
Cheers, Larry, and thanks for everything. Cheers, Larry, and thanks for everything.
The Quick Guide to Copy and Paste in GIMP
Here's a quick explanation of the process:
- Step 1: Select the area of your image that you want to copy
- Step 2: Press Control + C to copy the selected area to the clipboard
- Step 3: Press Control + V to paste image data from the clipboard back into your image
- Step 4: Position your new floating selection and press Control + H to anchor it
That's all there is to it! There's more than you can do with floating selections and pasting images from outside GIMP, so if you want to master the essential copy and paste commands, read on.
The Detailed Guide to Copy and Paste in GIMP
Copy and paste commands are pretty basic, so there isn't too much more to explain here, but there are a few useful details that don't really belong in the "Quick Guide" above. Let's take a closer look at how this whole system works!
Step 1: Making A Selection
The most important step in copy/paste operations is telling the computer what you actually want to copy. In GIMP, you'll use one of the many selection tools to highlight the area that you want to copy. There are quite a few selection tools available:
- Rectangle Select (R)
- Ellipse Select (E)
- Free Select (F)
- Scissors Select (I)
- Fuzzy Select (U)
- Select By Color (Shift + O)
It doesn't matter which selection tool you use, but it is important to make sure that you've also got the right layer selected in the Layers panel before you get started.
If your image only has one layer, you don't have to worry, but for multi-layer images, it's always important to make sure that you're working on the correct layer.
If you want to select your entire image, you can use the universal shortcut Control + A, which tells the computer to 'select all' in virtually every program ever made.

Your selected area will be outlined by a moving series of dashed lines known as a selection marquee (as shown above, but appears animated within GIMP).
Step 2: Copy Your Selection
At last, we get to the actual copy and paste part of the tutorial!
When you copy any data on your computer, it gets stored in a section of temporary memory known as the clipboard. The clipboard only has room for one object at a time, so if you copy another selection, the first one you stored in the clipboard will be overwritten.
Press the keyboard shortcut Ctrl + C to copy your selection to the clipboard. There is no visual confirmation that this was successful, but you'll know for sure in a second.
Step 3: Paste Your Selection
Once you've copied your selection to the clipboard, press Control + V to paste the contents of the clipboard back into GIMP.
Since this is all digital, you can paste the contents of your clipboard as many times as you want, and it will come out the exact same every time, just like a rubber stamp.
However, GIMP doesn't just dump the pixels right back into the image – instead, it places them in a specialized kind of layer called a floating selection, as you can see in the Layers panel screenshot below.
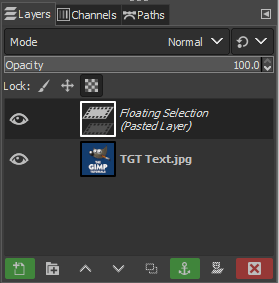
Before you continue editing your image (or pasting additional copies of your clipboard contents), you'll have to either convert the floating selection into a new layer or anchor it.
Step 4: Finalizing Your Floating Selection
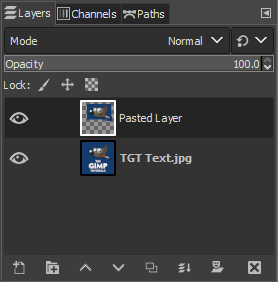
My personal preference is always to convert a floating selection into a new layer. It gives you the maximum flexibility, and you can scale, distort, or otherwise transform your pasted image data without having to also apply those edits to the rest of the image.
You can use the green 'New Layer' button at the bottom of the Layers panel, or you can use the keyboard shortcut Control + Shift + N to convert your floating selection into a new layer.
You can also simply anchor your floating selection using the green 'anchor' button at the bottom of the Layers panel, but this will discard any pixel information that was below your floating selection, so it's not usually the best choice unless you're in a hurry and you don't care.
That's just about everything there is to know about copying and pasting in GIMP!
Bonus Tip: Copying From Outside GIMP
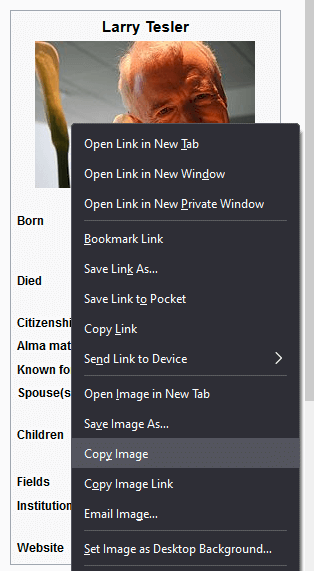
If you're pursuing a master's degree in making memes, you'll probably appreciate this tip. When you run across a great image browsing the web, you can simply right-click on the image and choose Copy Image.
The exact wording might change depending on which browser you use, but they're all similar enough that you should be able to spot the right command.
Then with another image open in GIMP, you can just paste as normal using the Control + V shortcut, and the image will appear as a floating selection in GIMP. It saves you all the long and extremely tedious work of saving the image as a file on your computer and then opening it in GIMP 😉
Happy copying and pasting!
bohlerereepliefor.blogspot.com
Source: https://thegimptutorials.com/how-to-copy-paste/
0 Response to "Gimp Video Duplicate Continue is Only Choice"
Post a Comment